
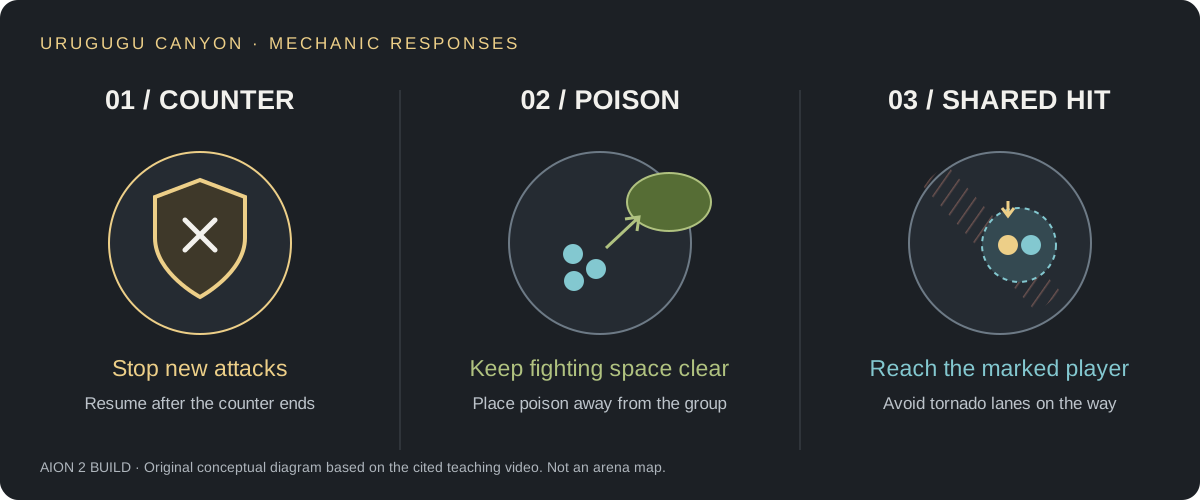
Read this version note before entering Hard
The teaching source was published September 20, 2026. Its introduction explicitly says the main coverage is Normal mode, with selected Hard differences; it is not an October Global Hard clear. We reviewed the complete approximately four-minute video, including the route, all three bosses, and the described Hard differences. Speech was transcribed locally and checked alongside gameplay frames. Small UI text in the 360p scan is not used as proof of exact tooltips.
The October 28 Global announcement separately adds Urugugu Canyon and Vakron Sky Island Hard at item level 2700, with a four-minute boss Frenzy timer and three revives per player. These rules come from NC, rather than from the older recording. Confirm the current encounter in your client before assuming a demonstrated HP trigger or pattern is unchanged.
| Global Hard content | Required item level | Boss Frenzy / revives | Official notice |
|---|---|---|---|
| Krao Cave / Draupnir | 2600 | 4 minutes / 3 per player | October 21 |
| Urugugu Canyon / Vakron Sky Island | 2700 | 4 minutes / 3 per player | October 28 |
First boss: stop feeding the counter
Video reference: 00:18–00:55. The Guardian Captain plants its shield and gains a counter state; the narration places this pattern below roughly 70% HP in the demonstrated version. Attacks into that state reflect damage to their user and add damage-boost stacks to the boss. If attacks are absorbed, the counter is followed by a large nearby blast.
The source describes a roughly four-second counter. Read the actual buff and animation instead of using four seconds as a blind countdown: stop new attacks when the counter begins and resume after it clearly ends. If attacks have already landed, prepare to leave the blast or use a defensive response appropriate to the current client. The creator explains that the blast can be perfect-dodged or blocked; do not rely on that rescue as the planned solution.
Editorial party call: assign one player to call “stop” when the shield is planted and “go” when the state ends. Move unconditional damage actions out of a routine that keeps firing through the window. This is a coordination recommendation; the recording does not establish the interaction of every summon, damage-over-time effect or queued projectile.
- Watch the shield and counter buff instead of focusing only on your attack bar.
- Stop launching new attacks during the counter state.
- If the group fed the counter, respond to the resulting nearby blast before restarting damage.
- Resume the normal loop when the counter state has ended; do not spend a fresh burst into it.
First boss: return to position after the dash
Video reference: 00:55–01:24. The creator explains a leash when the tank strays too far, followed by a slow and delayed ground-circle hazard on the hit target. The boss can also dash toward the tank, jump to a random player with a nearby area attack, and use another small area attack.
For the tank, recover melee position after the dash once it is safe, rather than remaining far away and inviting the leash sequence described in the source. For everyone else, watch the landing location and avoid standing on the delayed ground circle. Keeping the boss positioned is useful; chasing across a hazard to finish one attack is not a good trade.
If repeated deaths occur here, distinguish reflected damage during the shield state from an ordinary attack or a ground hazard. More equipment will not fix a party that continues attacking through a counter it could simply respect.
Second boss: keep poison from consuming the arena
Video reference: 01:28–02:13. Judge Urahum’s attacks can apply a short poison debuff. The creator describes a roughly three-second delay before it leaves a poison area lasting about forty seconds in the demonstrated version. Treat those durations as source-video observations, not a freshly verified October Global tooltip.
Move a debuffed character away from the group’s intended fighting space before the hazard appears, while keeping a safe return path and healer range. Repeatedly leaving poison beside the boss removes the party’s usable melee space. Chasing the boss through an existing pool compounds the problem.
Below the demonstrated approximately 65% transition, the source describes increased movement and attack speed, a rapid sequence of small, larger and very large nearby area attacks, and a dash with claw swipes. Do not re-enter after avoiding only the first circle in the sequence. The creator notes that avoiding or blocking applicable attacks can reduce poison placements; inspect your current class’s actual defensive behavior.
Editorial recovery plan: keep the next clean route visible, call poison placement briefly, and wait for the complete expanding sequence before re-entering. If the platform is already covered, prioritize a safe regroup over forcing uninterrupted melee damage.
Route: unlock the wind stream and collect checkpoints
Video reference: 02:13–02:39. After the second boss, the source leaves the room, turns toward a Windmage enemy and kills it to spawn a wind stream. It then rides the stream, uses a jump pad, glides ahead, crosses the bridge on the right and takes a second jump pad.
The recording also calls out checkpoint objects after landing and before dropping into the final arena. Follow the path through the grotto, clear the elite enemies ahead, and regroup at the checkpoint before the descent. Translated object names differ, so recognize the checkpoint interaction on your own client instead of relying on an uncertain transcription.
If the route appears blocked, check whether the Windmage that enables the stream is still alive or whether a party member missed the jump. Confirm everyone has reached the staging point before starting the final fight; a player stranded behind cannot help with the shared-damage response.
Final boss: avoid the fan lines and plan for the follow-up
Video reference: 02:39–03:09. The final boss turns toward a random party member and fires two sets of thick lines in a fan. In the demonstrated explanation, a hit can launch a player airborne, leading to a grab and ground impact. In Normal, the impact expands into successive donut areas. The creator describes a stack marker replacing that impact in Hard, plus an additional all-around line pattern.
Read the shape and move out of the fan lanes early enough to handle the next set. A tank-facing habit alone will not solve a pattern aimed at someone else. The source does not establish that every line attack in the encounter has the same follow-up; watch which cast is happening.
For Hard preparation, agree who calls a stack marker and keep the party within practical assistance range when no spread requirement is active. This is a preparation method based on the creator’s described difference, not a claim that every October Global Hard sequence has been tested here.
Final boss: share Tempest Strike while avoiding tornadoes
Video reference: 03:09–03:36. The source places major center transitions near 75% and 35% HP. The boss jumps to the middle, sends tornado lines through the arena and casts Tempest Strike on a player with a stack marker. The narration says at least one additional party member must stand with that target to survive in the demonstrated setup.
Identify the marked player, approach through a safe lane and share the marked hit while avoiding the moving tornado lines. Coordinate healing or protection around the impact rather than leaving the target alone while everyone independently dodges away. The illustrated minimum is not a universal safety guarantee for different gear, defenses or a later Hard version.
At the demonstrated 35% transition, a damaging storm remains around the outer edge. Move the party’s meeting point inside usable space and keep a path available for the next marker. Running to the far wall as a default escape can put the marked player somewhere allies cannot safely reach.
Editorial timing rule: recognize the transition cue before starting a long stationary cast. Save the attack for a usable window after the movement and shared hit. Successful movement preserves both lives and later uptime; a cast that prevents you joining the marker can cost the attempt.
A practical loadout and pull briefing
Keep the core class interaction, a deliberate movement response and the protection your role is assigned to supply. Tanking, healing and handling a shared hit are encounter jobs. A higher damage tooltip does not replace them, and the video does not validate a single best class composition.
Use a thirty-second briefing: call the first boss counter, place poison away from the fighting area, regroup at checkpoints, identify who calls final-boss stack markers, and confirm the revival limit for the selected difficulty. Write the chosen flex skill and its purpose into the planner.
For Global Hard, item level 2700 is the official access threshold, rather than proof of a clear. On the first attempt, determine whether the limiting problem is a failed mechanic, repeated deaths, lost boss access or the four-minute Frenzy timer. Change the part that addresses the observed failure.
Rewards: distinguish a choice from a random drop
The October 28 notes say Philosopher’s Stone: Revelation (Bound) is available as a chance reward and as a selectable guaranteed reward. The corresponding Hard dungeons also list guaranteed dungeon-specific Ariel Fragments, a chance of Expedition Hero Artwork, more Kina than Normal, and access to Wrathful Mind, Wrathful Will and Wrathful Ego. They do not provide drop rates or every quantity.
Before spending fragments, compare the 100-fragment Ariel crystal recipe with the one-fragment-for-five-Enhance-Stones conversion. Keep your next progression target in mind. Read the separate daily and gear guide for recipe limits and a spending example; do not estimate guaranteed runs to an upgrade from an unspecified drop quantity.
Watch the mechanics at the source
Madsin’s original video, published September 20, 2026. Open the relevant timestamp for the visual demonstration.
How do these choices change a real loadout?
The first boss kills the group immediately after everyone bursts
Check whether the burst overlapped the planted-shield counter. If so, the next pull needs a shared stop signal before it needs another offensive upgrade. Keep defensive rescue ready if an attack slips through, but stop feeding the state first.
The final boss marker appears while everyone is dodging separately
Name the marked player immediately and choose a reachable meeting position inside the safe arena. Approach without crossing tornado lines, then share the hit. If one player regularly runs to the damaging rim, fix that movement habit before changing the whole party composition.
What should you check before investing?
What is the Urugugu Canyon Hard entry requirement?
The October 28 Global announcement lists item level 2700, a four-minute boss Frenzy timer and three revives per player. These are official access and encounter rules, not proof that a character at the minimum will clear.
Is the teaching video an October Global Hard clear?
No. Madsin’s source is dated September 20 and mainly explains Normal, with selected Hard differences. The complete video was reviewed, but its regional and patch equivalence to October Global Hard is unverified. Official October rules are labeled separately.
Why should I stop attacking the first boss?
The creator demonstrates and explains a shield counter that reflects attacks, gains damage-boost stacks and can produce a large follow-up blast. Stop launching new attacks while the counter is active and restart when it clearly ends.
Where can I watch the exact mechanics?
Use the timestamped links below: the counter begins around 00:18, poison discussion around 01:28, route around 02:13, and final-boss mechanics around 02:39. The original creator’s video remains the visual reference.
Sources and scope
Official rules and numbers below come from NC announcements. Practical preparation and upgrade decisions are original editorial recommendations. The Urugugu guide separately attributes video demonstrations and their coverage.
- Madsin — [AION 2] Urugugu Canyon [NORMAL & HARD] guide: Secondary teaching video, published September 20, 2026, approximately 4:08. Full video reviewed with scene windows and a local speech transcript on October 30. It focuses on Normal with selected Hard differences; service/patch equivalence to October Global Hard is unverified.
- NC — Oct. 27 (PDT) / Oct. 28 (CET) patch notes: Primary source: Global boss changes, HP, Assassin skills, daily dungeon and gear progression. Read October 30, 2026.
- NC — Oct. 20 (PDT) / Oct. 21 (CEST) patch notes: Primary source: Krao Cave and Draupnir Hard entry, Ariel progression and Sorcerer fixes. Read October 30, 2026.
Scope: Global announcements read October 30, 2026. Later updates and current regional tooltips can change the rules. Source-video mechanics are not a verification of the October Global Hard client.
These decisions are not controlled DPS tests or a current-patch class ranking. Editorial policy · Submit a correction.